

I’ve had some inquiries from the FC lately about how to set up “adaptive hotbars” using macros. With macros in FFXIV it’s possible to greatly customize your hotbars in a number of ways. My setup is very basic, but there are much fancier ones possible if you really start getting into it: look for videos on Youtube talking about “extended hotbars” or “rotating hotbars” if you want to see some of the more impressive things you can do using macros to customize your UI.
WARNING: You are going to be copying over your hotbars a LOT when you do this! Before you start experimenting make sure you have saved your old hotbar files so you can recover them if you really mess up, or at least screenshot your current layout so you can manually recreate it.
For my setup I use two techniques, one extremely simple and the other a little more complicated:
- I use a toggle macro to turn hotbars on and off when I need them. For example, I have a hotbar for emotes that I generally don’t want displaying during combat, so I can turn it off in a dungeon and then toggle it back on if I’m just running around and want to emote at people. I also have a hotbar just for crafting and gathering — obviously I only want that bar visible when I plan to craft or gather.
- For each of the bars, I can rotate between two or three different setups for the bar, by making use of a macro that copies over the bar each time with a different set of commands. The “master bars” are saved on the unused hotbars of classes I don’t play (which means the hotbars for the pre-job classes) and then copied over each time I click the button to change the bar. The game saves a different hotbar setup for THM than for BLM, for example; once you have opened BLM and don’t expect to ever play THM again, the hotbars for THM are essentially blank real estate you can use to store your “master bars” for copying on the fly, with macros. When you want to adjust your adaptive bars, you must make the change on the master bar or the change will vanish when you click to change the adaptive bar!
Here’s a part of my UI on Diana in the screenshot below. I have bar 9 set up vertically on the right edge as my “anchor” bar. Bars 4 and 5 are set to permanent and can’t be toggled off (unless I go into the HUD and do it there.) Bars 7, 8, and 10 can be turned on or off freely by clicking the macro buttons next to them on bar 9. (The bar numbers are completely arbitrary, as is their orientation — feel free to set up your bars in whatever pattern you like.)

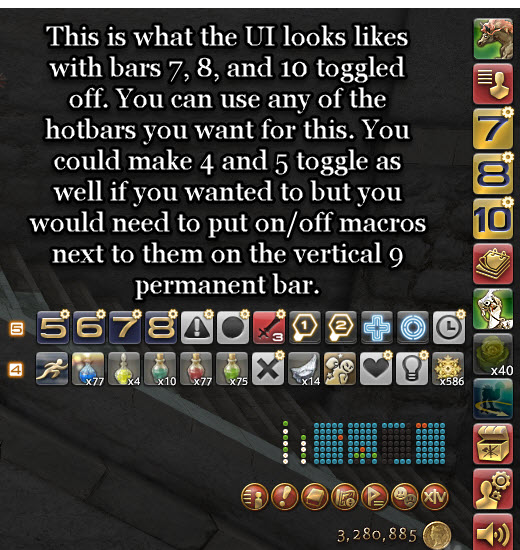
The macro command for the on/off toggle buttons (7,8,10) is extremely simple:
/hotbar display 7
(Toggles bar 7 on and off)
/hotbar display 8
(Toggles bar 8 on and off)
…and so on. Just put the right bar number in the macro, assign a picture, and drag the picture to your anchor bar. Clicking that macro will now turn that bar visible or invisible with one click!
Setting up the bars to adapt with a single click is a little more involved. The first thing you want to do is pick the class or classes whose hotbar space will store your master bar setups. For Diana, I wanted each of the three bars to be adaptive, so I decided to put each set of adaptive bars in a different class. This isn’t required; you can mix and match different bars from different “storage” areas as long as you adjust the macros appropriately, which we’ll get into below. I just thought this was an easy way to organize my bars.
Here’s a shot of Diana’s gear sets for her master bars:

Here’s the master bar set for the Class/Battle Bar (10):
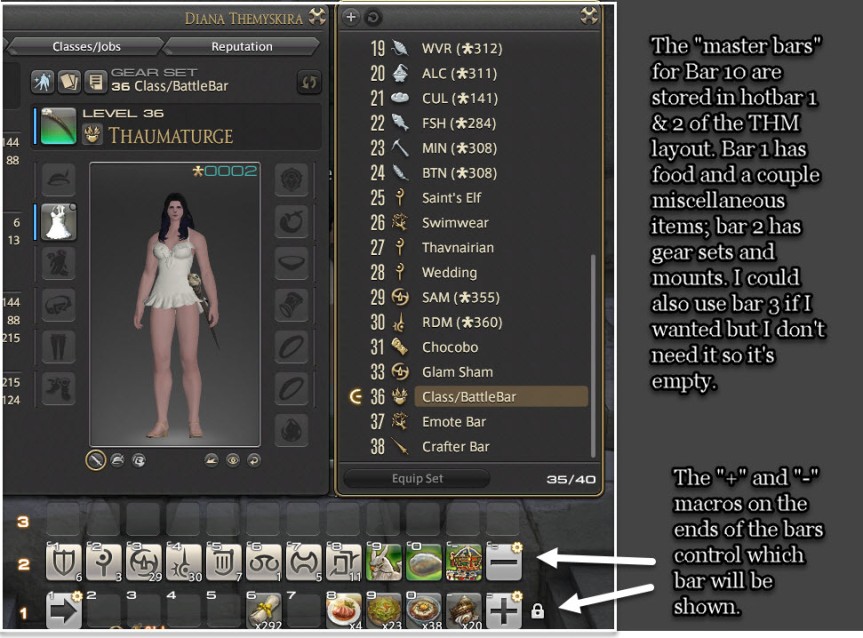
The key to swapping Bar 10 lies in the macros I have placed in the last slot on each of the bars. Each of them contains a different copy command!
The “minus” sign on bar 2 has this macro:
/hotbar copy THM 1 share 7
When this macro is clicked, the contents of THM hotbar 1 will be copied over onto shared hotbar 7.
The “plus” sign on bar 1 has this macro:
/hotbar copy THM 2 share 7
When this macro is clicked, the contents of THM hotbar 2 will be copied over onto shared hotbar 7.
What this means is that when you click the plus or minus sign, you will cause the current set of commands on adaptive bar 7 to change to the set of commands stored in the specified bar — including changing the swap macro.
Here’s the setup for the Emote bar (8):

Although I’ve reused the minus and plus macro signs, these are NOT the same macros I had on the THM bars! They are different macros entirely.
The “minus” macro here says:
/hotbar copy CNJ 1 share 8
And the “plus” macro says:
/hotbar copy CNJ 2 share 8
This works exactly the same way that adaptive bar 7 works, only the commands get copied into adaptive bar 8 instead.
The crafter bar, bar 10, has one difference: instead of having two possible bar setups, it has three, because I have way too many crafting macros. It looks like this:

You can see that all three of the Lancer’s hotbars are filled here, and each bar ends with a “plus” macro. THIS IS NOT THE SAME MACRO IN EACH SLOT! They just all use the same macro image. Each of these end macros is different, and they are all different from the plus macros used in the bar 7 and bar 8 macros. You may want to make your macro symbols different if it will help you keep track of which macro goes where.
The “plus” macro for Lancer hotbar 1 is:
/hotbar copy LNC 2 share 10
When this macro is clicked, the adaptive bar 10 will change to the setup shown in Lancer hotbar 2.
The “plus” macro for Lancer hotbar 2 is:
/hotbar copy LNC 3 share 10
When this macro is clicked, the adaptive bar 10 will change to the setup shown in Lancer hotbar 3.
The “plus” macro for Lancer hotbar 3 is:
/hotbar copy LNC 1 share 10
When this macro is clicked, the adaptive bar 10 will change to the setup shown in Lancer hotbar 1.
This way, each time I click on the Plus sign on this bar, it will cycle through each of the three bars until I find the one I want.
And that’s all there is to making your bars adapt! The general syntax for the bar-copying macro is:
/hotbar copy [FromClass] [FromBarNumber] share [ToBarNumber]
You can link together as many different bars as you’re willing to cycle through. On Auric my adaptive crafter bar cycles through four different sets of stored bars (did I mention I have too many crafting macros?). Just make sure that your bar copying macros link together properly so that each of your bar setups is displayed in turn as you click through.
So the completed adaptive bars look like this:
Adaptive bars hidden:

Adaptive bars all showing, first bar set.

Adaptive bars all showing, second bar set.

Adaptive bars showing third set of crafter commands.

I can mix and match all of these as I please, leaving some bars on, some bars off, and displaying whichever set of commands I want to have handy!
