

With the release of the Heavensward Expansion, it became possible for Free Companies to build their own Airships in the company workshop.
Quick Links
Constructing Airships
The Airship Control Menu
Sending Airships Out on Ventures
Taking Airships to the Diadem
Airship Maintenance
Airship Sector Map & Loot List
As of patch 3.25, Free Company airships have two functions:
- They can be used as Free Company retainers and sent out on voyages to sectors of the Sea of Clouds to look for rare and valuable items. These voyages can take from half a day to several days at a time, depending on the speed of the ship and how far it needs to go.
- They can be used to transport players to the game zone called “The Diadem,” where players can do battle with monsters for “spoils” that can be exchanged for rare items, and Disciples of the Land can gather rare crafting materials found nowhere else in Eorzea. There are three difficulty levels for the Diadem, with the same map but different monsters and slightly different setups; the hardest difficulty level can only be accessed via a Free Company airship. The easy and medium levels can be accessed either by a Free Company airship or through the general-access entry at Foundation’s airship dock; however, using the Free Company airship allows players complete control over the membership of their Diadem group, while the Foundation entry option requires either a full party of eight to be premade, or for the party to be filled with random players.
This page is intended as a general guide to building, repairing, and using our airship fleet.
Constructing Airships
Each Free Company can run a maximum of four airships, and currently our FC has a complete fleet. However, in the future we plan to acquire at least one more affiliated house with workshop, which will allow us to expand our fleet [UPDATE: With patch 3.3 we have acquired an affiliated house and begun to construct our second Fleet!] It’s also possible that Square will eventually increase the airship fleet size for Free Companies beyond the current four. In either case, we will need to build more airships!
Creating an airship is fairly straightforward. Each airship requires four components:
- Hull: This determines how far the ship can travel in one trip
- Rigging: This is the ship’s propulsion and determines how quickly it can fly
- Forecastle: This is the ship’s bridge and determines how easily the ship can locate new sectors. It also may influence how likely a ship is to bring back a larger variety of items.
- Aftcastle: This is the ship’s cargo bay and influences the number and quality of the items the ship brings back, although there is a large random element to this as well.
Ships possess a number of “airframe” points, based on their Rank; an airship’s Rank is its experience level. A ship’s airframe points are equal to its rank plus eleven, with a max of 61 (Max current ship rank 50, plus 11.) Each component takes up a certain number of airframe points, with better components taking up more points. Brand-new ships start at rank 1 with very limited airframe points. Ships gain experience and ranks by completing ventures, and ranking up allows them to be fitted with better components. There are far too few airframe points even at max level to fit every airship with all the best parts, so choices need to be made about what abilities to emphasize when constructing or upgrading a ship. Currently our four ships are designed for maximum quality and quantity of cargo; they are quite slow, but have a good chance of returning rare items each trip. If speed were emphasized in the designs, the airships would be able to make many more trips but at a lower chance of acquiring worthwhile items.
Ship components are constructed in the Workshop (see that page for details on how to use the Fabrication Station) and then assembled at the Flight Control Panel. Brand new airships can only be made of the most basic parts — the Bronco component set –due to the limited airframe points. As ships gain airframe, more advanced parts can be swapped in. Parts can be swapped between airships, but not directly; it is necessary to have a third component available to make the swap. That is, Eden and Strahl could not just swap hulls; the extra hull would have to be moved onto the Eden, then the Eden’s hull moved to the Strahl, then the Strahl’s hull placed on the Eden. (Yes, this is awkward and annoying.)
To assemble a new ship, there must be a slot open in the FC’s fleet, and the FC needs to purchase a Flight Credit from the Housing Resident Caretaker (at the Dappled Stalls in the Lavender Beds area) for 10,000 company credits.
The Airship Control Menu
Once an airship is constructed, all airship functions are accessed from the Flight Control Panel. Clicking on the panel brings up a list of the ships in the Free Company fleet, like this:
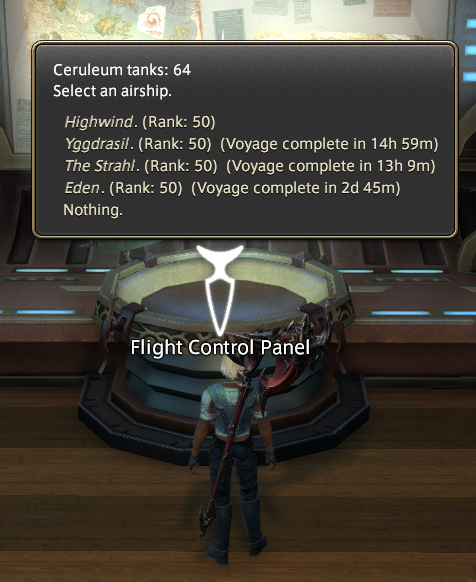
This shows our current fleet at the Lavender Beds house when this screenshot was taken. We have four max-rank airships (level 50) named the Highwind, Yggdrasil, Strahl, and Eden. In this screenshot, the Highwind is in dock, while the other three ships are currently out on “exploratory voyages,” which are ventures that we hope will produce useful and profitable items for the Free Company. This list shows how long it will be before the three ships currently out exploring will be back in dock. Exploratory voyages typically last from half a day to two days or more, depending on the ship’s speed and the length of the voyage. Ships with better speed will return sooner, but the higher-quality engines limit their cargo capacity. We generally favor slower ships with better cargo holds.
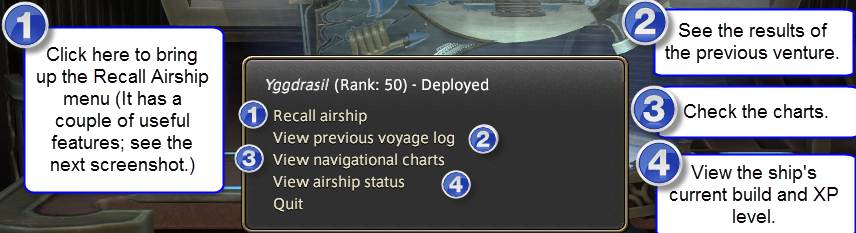
Most of the management of airships can only be done while they are in dock. Clicking on the name of a ship when it’s available produces this menu:

If the ship is out on an exploratory voyage, clicking on the ship name produces this much more limited menu instead:
In order to work with the airship in any way, you first have to recall it, which brings it back instantly but without any items, even if the venture was nearly over. Any time spent on the voyage is wasted, as is all the ceruleum gas used for the journey (yes, even if the ship was only gone five minutes before you recalled it.) So recalling ships should generally be avoided. That having been said, if there’s a good reason to recall a ship, go ahead; the losses are not that serious.
Selecting “Recall Airship” brings up the following menu:
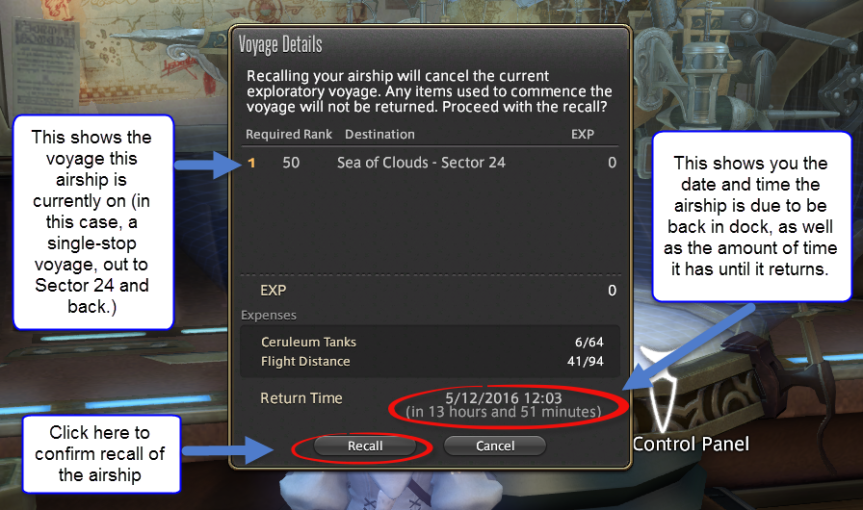
This menu is what you need to use if the ship is away from the dock and you want to know where it was dispatched to and when it will return. If you don’t wish to actually recall the ship, just hit “Cancel.”
Sending Airships Out on Ventures
Before you send an airship out on an exploratory voyage — that is, a venture — you’ll need to figure out exactly what it is you are hoping to get. On the Airship Sector Map page, you’ll see a list of the sectors our airships can visit in the Sea of Clouds, and the common and rare drops for each. An airship can visit multiple sectors — up to five in one trip — as long as it has the required range, which is determined by which hull component is equipped. It is more efficient for a ship to visit multiple sectors in one trip, but the total return time will be increased with each sector added to the itinerary. Sectors can be visited in any order, but sticking with the suggested routes indicated on the Sector Map will be much more efficient than randomly selecting sectors to visit.
To dispatch an airship on an exploratory voyage (venture), click on the name of the ship when it’s in dock to bring up the main airship menu. (Refer to the second screenshot on this page, up above.) Select the second option, “Deploy Airship on Exploratory Voyage,” and this screen will appear:
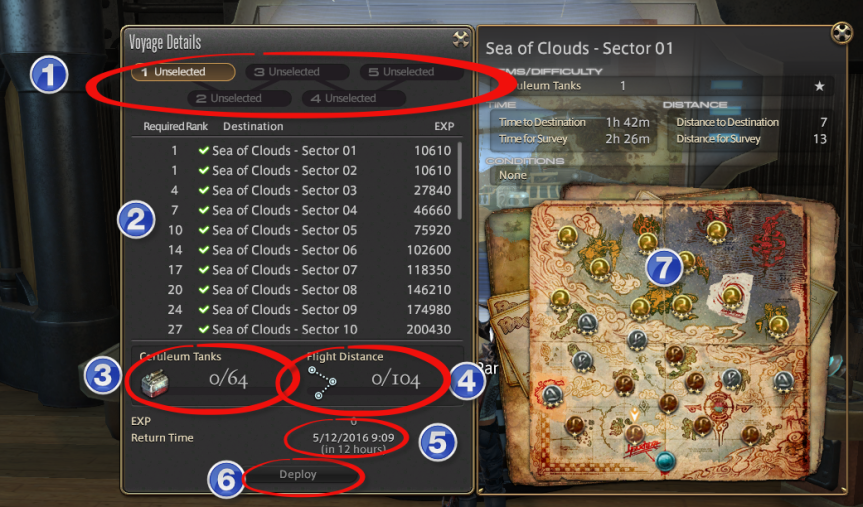
- This shows your ship’s current itinerary. As you select sectors, they’ll be added here. You can choose up to five sectors, assuming your ship has the Flight Distance rating to reach them. (See #4 on this list.)
- This is the list of sectors available to visit. “Required Rank” is the ship rank needed to go to that Sector. So, for example, an airship needs to be Rank 24 before it can visit Sector 9. The EXP amount is the amount of experience an airship gets from visiting that sector (assuming the ship is not max rank already.)
- This shows how many ceruleum tanks it will take to travel the route you currently have selected. This example reads “zero” because no sectors have been picked. “64” indicates that the person using the Flight Control Panel is carrying 64 ceruleum tanks in inventory. Always have a good supply of ceruleum gas tanks on hand when you are sending ships out to explore; if you need to buy some more tanks, speak to the Workshop Mammet.
- This shows the Flight Distance for the current route you have chosen and the maximum distance this ship can travel in one voyage (104 units in this case.)
- This shows how long it will take this ship to travel the selected route and when it will return. Twelve hours is the base flight time it takes for the airship to get to the Sea of Clouds entry point and back to dock; each sector visited will add more time to this amount, for traveling, exploring, and collecting items.
- When you are satisfied with your planned route, click Deploy to launch the ship.
- This half of the screen shows a small sector map and information on each sector as you select it. This is display only; there are no airship controls on this half of the panel.
Here’s what this screen looks like with a route selected:

This airship will travel to sectors 1, 5, 7 , 8, and 10, in that order. This route uses up nearly all of its available Flight distance, will cost 11 tanks of ceruleum gas, and will take just under two days to complete.
When you’re satisfied with your chosen flight plan, click on “Deploy” and wish the airship a profitable voyage! (Note: Airships cannot be lost or delayed when exploring.)
You’ll get a brief cut scene of the ship leaving the FC house and setting out on its voyage.
If you want to check on the progress of the ships while running around in Eorzea, first access the Timer menu, like this:
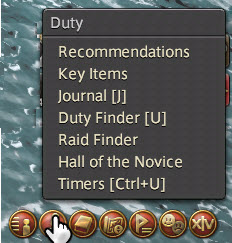
Once the timers are open, click on the Estate tab, and under “Exploratory Voyages” you’ll see how many ships are still out.

Click on the small page icon at the right side of the screen, and you’ll get a menu of the current fleet and how much longer it will take each ship to complete its current assignment.

When your ship returns to dock after completing its mission, you will see the following notice when you open the Flight Control Panel:

You can then click on the ship name to open up the Flight Log and see what goodies the airship picked up.

You can now redeploy the airship to do the same route again with the “Redeploy” button, or you can go back to the sector chart screen and set up a new trip.
Taking Airships to the Diadem
Taking an airship to visit the Diadem zone is quite a bit simpler than sending it out on a venture voyage. Any FC member of rank Spark Knight or above can use the airships to visit the Diadem, as long as a ship is currently in dock for use. We try to keep one on standby for this purpose. If there’s no ship in dock and you want to go to the Diadem, ask an officer and we may be able to bring one back to the dock for you.
What’s the Diadem?
(Note: This Diadem info is current as of Patch 3.25. It will likely change in future patches. Also please note that this is only a basic explanation of the Diadem and does not cover everything about the zone.)
The Diadem zone is an experimental game area introduced in patch 3.1, released in early November of 2015. Unlike other areas of Eorzea, the Diadem cannot be reached by land or sea, but only by air. Players have two options for reaching this zone:
- Head to the Airship Landing in Ishgard (Pillars subsection, by the Aethenaeum Astrologicum aetheryte), buy a Mission Ceruleum Voucher for 700 gil from the appropriate vendor (Jaquoinie), and sign up with Mission Commander Aurvael to have the Duty Finder match you with other players for the trip. You can only access the Easy and Medium levels of the Diadem by this method. You are only allowed to roll “Greed” on any drops when you are matched with random players.
- Use an airship from our Free Company workshop, which allows you access to all three levels of the Diadem (Easy, Medium, and Hard) and gives you complete control over your party composition, allowing you to enter the Diadem with as few as two people. You are allowed to roll “Need” on drops when you enter the Diadem this way.
Players who go to the Diadem can do the following:
- Fight tough monsters for gear drops of ilevel 160, 180, and 210 (depending on the monster rank.) The gear can be worn or traded for “Spoils” from Spoils Traders located at the Diadem vendor, the airship dock in Ishgard, or at the entrances to the housing wards. Spoils can be used to purchase level V materia, rare crafting materials, and the Pegasus mount. Players who plan to fight in the Diadem should come in a full group of eight as the monsters are quite challenging.
- Gather rare crafting materials with mining, botany, and fishing. Some materials such as Sphalerite, Cloud Cotton Boll, Royal Mistletoe, Pterodactyl, and Gem Marimo can only be found in the Diadem. Gatherers at level 58 or better can access the nodes in the Diadem. (Note that stealth doesn’t help in the Diadem; the monsters can see right through it, so be careful when you gather!)
- Explore the Diadem for hidden treasure chests.
- Complete three of the items on the objectives list to get a small number of Lore and Esoteric tomestones.
Trips to the Diadem come in three difficulty levels:
- Easy: Lasts for 30 minutes and the monsters are a bit less tough. (Not much, though.) One aetherial current needs to be found to enable flight.
- Normal: Lasts for 45 minutes. Two aetherial currents need to be found to enable flight.
- Hard: Lasts for 60 minutes. Three aetherial currents need to be found to enable flight.
The map does not change between trips, but the locations of the aetherial currents do. The same gathered items are available at each difficulty level, but the node locations are different.
All Aboard!
To take a ship to the Diadem, first form a party of at least two people. The leader of the party must be an FC member with permission to use a ship, but the rest of the group can be non-FC. All party members must have a battle class at level 60 with a minimum item level of 179, each must be carrying a green Mission Ceruleum tank (available in the company chest), and all must be present in the FC Workshop. When the group is ready to go, the Party Leader can click on the name of a ship in dock to bring up the ship menu, and choose the first option, “Ready the ship for exploratory mission.” If everyone in the party is correctly set up, this screen will appear:
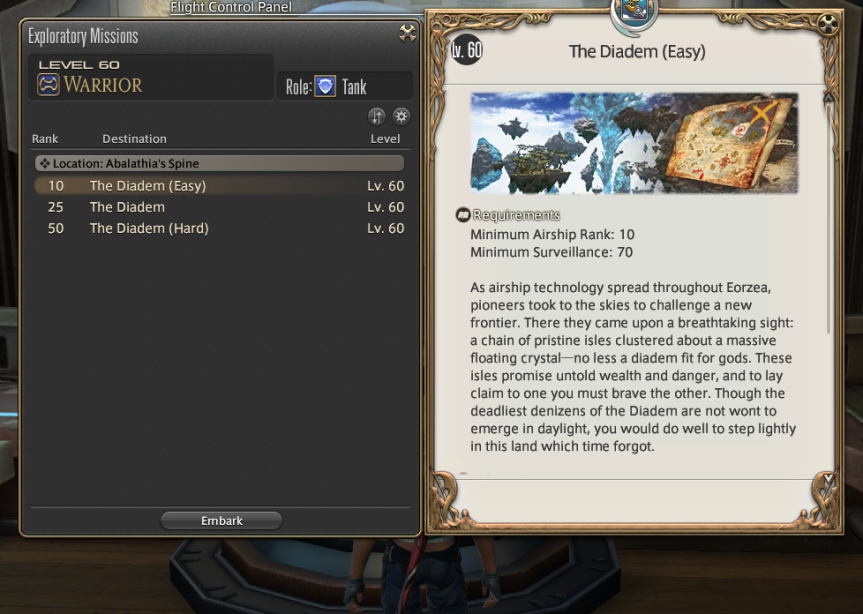
Note that airships have a minimum rank necessary to access the three difficulty levels of the Diadem. A max rank ship (rank 50) is needed to get to the Hard level.
Select the difficulty level you want to travel to and click “Embark,” and you and your party will be transported to the Diadem. Players can leave the Diadem at any time by using the “Leave” option from the Duty Finder menu, but if you leave early you can’t rejoin the same party; you will have to enter the Diadem again. Diadem trips are limited to one every thirty minutes. You can see how much time is left before you can re-enter by going to the Duty menu, selecting Timers, and looking where it says “Next Exploratory Mission.”
A ship that is used to travel to the Diadem returns to the FC dock after just five minutes and can then be used again to take a second group to the Diadem if necessary.
Airship Maintenance
Each time an airship is sent out on a venture or a trip to the Diadem, it suffers from wear and tear on the journey. If the airship is too damaged, you will not be able to dispatch it from the dock until repairs are made.
To repair an airship, it must be in dock. Click on the fifth option on the main airship menu, “Repair Airship Components,” to get started. You’ll see the ship’s component screen:

In this screen, you can see that the Highwind’s components are about 50% damaged. If they were undamaged, the bar next to each component would be a solid green. To make repairs, you will need the crafted item Airship Repair Materials (level 50 2* craft, all classes). The higher quality the component, the more of these items will be needed to make the repair.
- Bronco: 1 ARM
- Invincible: 2 ARM
- Enterprise: 3 ARM
- Invincible II: 4 ARM
- Odyssey: 5 ARM
- Tatanora: 6 ARM
- Viltgance: 7 ARM
To make a repair, make sure you have enough ARMs in your inventory, then select the component you want to repair. All four components have to be repaired individually (there’s no “Repair All” option, unfortunately).

As far as we can tell, damage to airships doesn’t affect their performance on voyages until they break completely, at which point the ship can’t be used until repairs are made. Repairing a component before it is completely broken will always use up the full number of ARMS, however, even if the component is only 10% damaged. So in general we do not repair components until they are at 80% damage or higher, to save on repair materials.
