

Quick Links
Getting Ready to Garden
Basic Gardening
Advanced Gardening
FFXIV Gardening Database & Documentation
Gardens in FFXIV have two functions (as of Patch 3.25):
- Basic Gardening: Allows you to grow crops for use by culinarians and chocobos.
- Advanced Gardening: Allows you to do cross-fertilization to produce rare seeds and grow exotic plants for use by various crafters.
Getting Ready to Garden
In order to garden, you need three things:
- One or more garden plots
- Soil
- Seeds
You can also get fertilizer but it’s completely optional.
In order to set up a garden plot, you first need to purchase a house, then buy and install one or more garden plots on your estate.* Small houses can have one plot; medium houses can have two; and large houses can have three. Each garden plot has eight available beds for planting, arranged around a central scarecrow. Here’s a typical garden plot with crops in various stages of growth.
(*Note: Since this guide was written, Flower Pots have been added to the game. Pots can be used in rooms, houses, and apartments to grow plants, but NOT to do crossing. That still requires a garden. Flower plants can also be used to grow flower seeds, which can’t be grown in the garden. Flower seeds can produce different flowers by the type of “pomace” you put on them. You can get flower seeds, pomace, pots, and potting soil from the Housing Vendors in the housing zones.)

Once you have a garden plot, the next step it to get soil for it. Yes, there’s dirt there already, but the crops won’t grow without an additional layer of topsoil that you have to provide. There are three types of topsoil:
- La Noscean Topsoil: Increases the chances that your crops will be High Quality. Generally not useful.
- Shroud Topsoil: Increases the crop yield (except for exotic seeds — see the notes below!) Use this for basic gardening.
- Thanalan Topsoil: Increases the chances that two seeds will cross-fertilize. Use this for advanced gardening.
- Potting soil: Very cheap and available from housing vendors, but has no bonuses at all.
Each topsoil comes in three “Grades,” with Grade 1 being the poorest and Grade 3 being the best. Grade 3 topsoil should be used whenever possible to maximize the soil effects. Topsoil can be gathered by Miners. The Grade 1 and Grade 2 topsoils are infrequent drops from normal mining nodes, and the Grade 3 topsoil drops from timed nodes. (Check your gathering log for locations.)

Another way to gather topsoil is to level a mining retainer and pay ventures to have your retainer go out and dig it up for you, if you’ve gathered it yourself once. (This is my favorite method.) As a last resort you can buy topsoil off the Market Board.

Now that you have the soil you need, the next thing to get are your seeds. Many basic crop seeds can be gotten by using the Botany skill and looking for seeds that show up every now and then in normal botanist gathering nodes, like this:

Other seeds may not be native to Eorzea, forcing you to buy them from vendors. Krakka Root seeds, for example, can’t be gathered or made with crossing, but are purchased from the Material Supplier vendor at the Dappled Stalls in the Lavender Beds.

Similarly, seeds to grow chocobo dye fruits can only be bought from the Hunt Billmaster at your Grand Company HQ for Allied Seals (not gil!):

And some seeds can’t be gathered or bought from vendors at all, but have to be produced through crossbreeding two other seeds with Advanced Gardening (see below.) The only source for seeds from rare crosses are players, meaning that if you don’t make them yourself, you’ll have to buy them at the Market Board and pay whatever the going rate is, which can be extremely high for exotic in-demand seeds!
Basic Gardening
Basic gardening is straightforward. This is what to do if you just want to grow crops for direct use, such as Krakka Roots and dye fruits for training and coloring chocobos.
For basic gardening, you should use Grade 3 Shroud Topsoil if possible, to get the greatest yield of crops per seed packet. If you can’t get Grade 3, you can use a lesser grade, but the benefit won’t be as great.
IMPORTANT NOTE: If you are growing an exotic seed for use, such as Jute or Glazenut, using Shroud Topsoil will not — repeat, NOT — increase your crop yield! Exotic crops such as this never give more than one crop per seed packet. (They just don’t grow well in Eorzea, I guess.) If you are not trying to cross your exotic seeds, you can plant them with whatever soil is cheapest or easiest to get, as it won’t make any difference to the result. So save your good topsoil for when it will be useful. Extra note: a couple of exotic seeds may give you two plants instead of one for using Shroud 3 soil, such as cloudsbreath. This is rare though. Consult the gardening database to be sure.
Make sure you have enough bags of soil and enough packets of seeds to fill up the empty beds in your plot. If you’re starting a large plot fresh, you’ll need eight bags of topsoil and eight seed packets to plant the entire plot.
Start by selecting an empty garden bed. In the panel that appears, there are two boxes: the first allows you to select a type of topsoil, and the second allows you to select a seed packet. After you’ve selected both of these, you’ll be asked to confirm your choices:
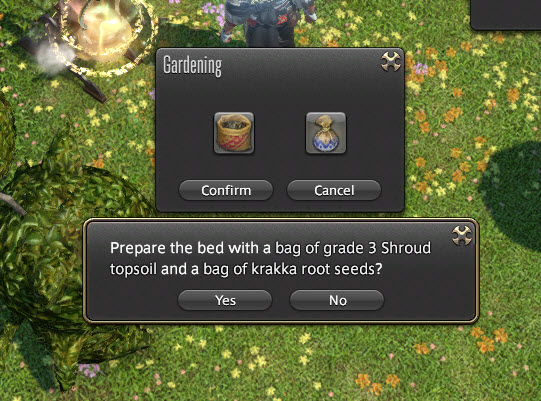
When you confirm the selection, the seeds will be planted and a sprout will appear in the garden bed. Continue with this process until you have planted all your seeds.

Seeds take a number of days — real ones, not Eorzean ones! — to produce crops. The exact number of days varies with the seeds. Some plants take only a day or two to mature, but others can take substantially longer. Thavnairian Onions, for example, take a full ten days to mature from seed to harvest.
Crops need to be tended to once every 24 real hours in order to stay healthy. To tend your crops, select a garden bed and choose “Tend Crop”. (NOT “Fertilize Crop.” That’s different.) You don’t need any special tools or items to tend to your crops.

Crops that have not been tended will start to give off an unhealthy purple smoke, and selecting that crop will cause a warning statement to appear:
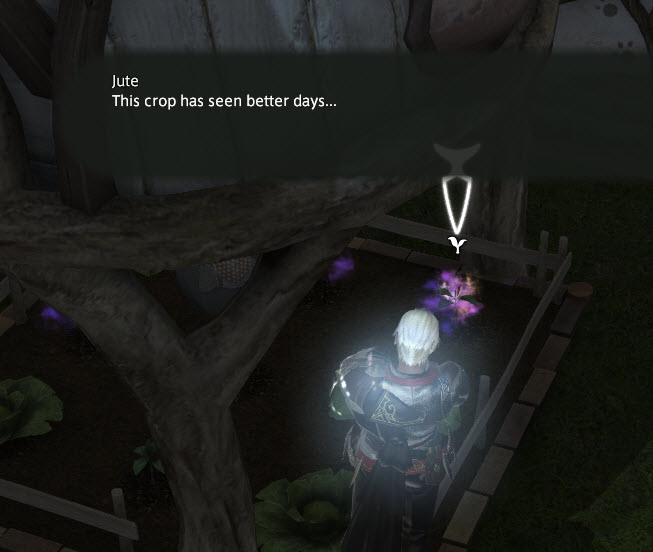
If you allow your crops to start smoking three times, they will die on you. Or, if they go for three full days without watering, they will also die. So don’t let this happen! Tend your crops regularly! You can’t harm your crops by tending them too much, but you can lose them by tending them too little. Outdoor plants can be tended by anyone, so bug your friends to help you keep your plants watered! (Indoor flower plots can only be tended by the owner or tenants of the house, so do those yourself.)
The option to “Fertilize Crop” on this same menu allows you to put fishmeal fertilizer on a crop, if you have some in your inventory. This is entirely optional; the plants will grow just fine without it. Fertilizing will shorten the growing time of your crop by one real hour each time you fertilize it, and you can fertilize once per hour. IMPORTANT: When you increase the growth rate of your crops, you shorten the time it will take before they need tending! You should always tend your crops immediately after fertilizing or they might wilt and die much sooner than you expect. Fishmeal can be bought from the same vendor who sells Krakka Root, or it can be made by desynthesizing fish, if you have the desynthesis skill. It takes one bag of fishmeal to fertilize one crop.
You can use the “Remove Crop” option to clear away a dead crop, or to remove a live one if you want to use that garden bed for something else. However, if you remove a live crop, you get no harvest from it, and the seed and soil you used will go to waste.
When your crops are ready to harvest, the plants will look large and mature and will give off a happy sparkle, like this:

Select the sparkling garden bed and you will be given the option to harvest your crop!

Plants that are ready to harvest cannot be tended (no option appears). Mature plants will never rot, so you can leave them there as long as you like.
When you harvest, the crops will be placed in your inventory along with any seeds you might also have gotten. The bed will then be ready for the next planting.
Advanced Gardening
Unlike Basic Gardening, the focus in Advanced Gardening is not on the crops you grow but on the seeds that you hope to make by cross-fertilizing two other seeds. For whatever reason, in Eorzea many completely unrelated plants can be crossbred to produce a third completely unrelated plant.

Here is the basic outline of plant crossing:
- First, you have to figure out exactly what you’re after, and what you have to cross to get it. FFXIV Gardening is an invaluable site for this. Put a seed name into the search box (full name; it doesn’t handle partial searches) and hit Enter to bring up the info page for that seed. This documentation page will explain how to use the information you get. Sometimes the seeds you need will be easy to gather or cheap to buy on the Market Board, but sometimes you will have to do one or more sets of seed crosses just to get the seeds to cross to make the ones you want. It can be an involved process!
- A cross seed has a chance (not a guarantee!) to be generated when you plant two crops right next to each other. The first crop planted will not generate a cross, but the second crop has a chance to do so. The chance of success is based on which crops you planted and the topsoil you use. You should always try to use Grade 3 Thanalan Topsoil when doing crosses. Grades 2 and 1 give a lesser benefit.
- Many, but not all, crosses have a chance to produce more than one kind of hybrid seed — meaning in these cases, you might not get the seed you were after even if the cross works! This is called an “alternate cross.” Only one bag of seed is produced per cross attempt; you will either get what you want, or you’ll get the alternate cross, never both from the same attempt. (Or you could get nothing, of course.) You should take this into consideration when planning out your crosses.
Here is an example of the information page on Chives.

- This shows the seed type for Chives. They’re deluxe, so you will always get exactly two Chives per seed, no more, no less.
- The item level of this crop is used for culinarian desynthesis.
- It takes five days after planting for chives to be ready for harvest.
- Seeds for this crop can only be obtained by crossbreeding.
- This shows the first plant to use when setting up a cross for chive seeds. You have five possible crosses to use here. The two-way arrow means the two parent crops can be planted in either order. The one-way arrow on the last cross means the La Noscean Leek must be planted first.
- This is the second plant to use to get the desired cross.
- This column shows you if there is an alternate result possible from this cross. In general you want to avoid crosses with alternate outcomes.
- This is a rating (not a percentage!) of the efficiency of the cross. See the Documentation page for a run down of the factors involved in determining the efficiency rating of any particular cross. In general you want to stick to the green rated crosses; the yellow crosses are more time-consuming and/or expensive to do, and the red crosses should be avoided as they present significant barriers to success.
- This third possible cross for Chive seeds has an alternate cross of Shroud Tea, which is nearly worthless. This cross should be avoided unless none of the others can be done.
- This panel shows what other crosses you can try for if you have Chives planted and growing. Chive is a parent plant for crosses that can produce the Blood Pepper and the Eggplant Knight minion, among other less valuable possible crosses. You can also cross Chive with another plant to get more Chives, which is useful for setting up a Loop. (See below)
Planting Order
You need a minimum of two seeds to do one cross, but the most efficient way to cross for seeds is to dedicate an entire garden plot to it so you can do multiple crosses at one time. You will need four of each seed to do this. The image below shows a garden plot planted to try to produce Chive Seeds from a cross of Dzemael Tomato and Dalamud Popoto. This cross has no alternate crosses that might pop up instead.
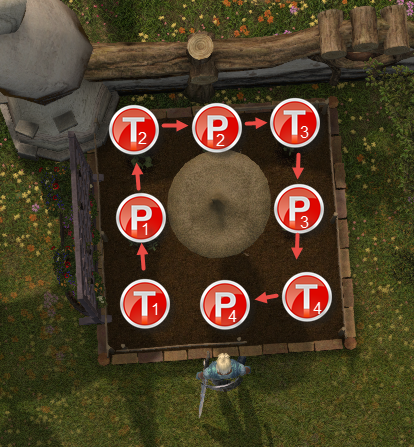
Starting with the bed in the lower left corner, plant your seeds in alternate beds: Tomato, Popoto, Tomato, Popoto, and so on, going around the plot clockwise. Or, you can start in a different bed and go around counterclockwise if you want — the important thing is that you plant the seeds one after the other in adjacent beds, alternating seeds as you go.
If you use the planting order shown here, you will have seven opportunities to get a bag of Chive seeds when these crops are grown and harvested. The first crop, labeled T1 (tomato seed 1) will not produce a cross seed. Any successfully crossed seeds will be placed in your inventory when you harvest the parent crops. You’ll also get the tomatoes and popotoes of course! The chance to generate a seed happens when the crops are first planted, and nothing done after that will affect the odds of getting a cross seed, as long as you don’t let the plants die. Tending and fertilizing won’t improve your chances of getting your desired seed, sorry.
Loops
In the Chive cross example above, you may have noticed that the tomatoes and popotoes require a different number of days to mature. The tomatoes ripen in five days, and the popotoes take six. This gives you an opportunity to set up a “loop” to generate seeds. Instead of waiting for all the crops to ripen and then replanting the whole garden plot, you can harvest the tomatoes on the fifth day, and then immediately replant with more tomato seeds in the open beds, allowing all four of the new seeds a chance to cross with either of two popoto plants, increasing the odds of successful cross. Then, when the popotoes ripen the following day, harvest those and immediately replant with four new popoto sets for further crossing chances. Keeping a cross going like this will increase your yield of seeds substantially over replanting the entire bed each harvest.
You also have the option of changing to a new cross using the plants already in the plot. For example, after harvesting the popotoes, you could instead replant the empty beds with mandrake seeds, hoping to cross the dzemael tomatoes with the mandrake to produce the King Tomato minion.
Some plants can be crossed in self-sustaining “infinite loops.” Chive seeds, for example, can be crossed with Dalamud Popotoes to yield more Chives. This gives you the option of first crossing Dzemael Tomatoes with Dalamud Popotoes to make chive seeds, then after harvesting the tomatoes the first time, replanting those beds with chive seeds to yield yet more chive seeds from the Chive x Dalamud Popoto cross.
Advanced Gardening Example: Creating the Blood Pepper
The blood pepper is a plant currently (as of patch 3.25) in high demand for crafters, as it is required to make a number of desirable high-level crafted goods, including the primal minion set. It’s also a very complicated plant to cross.
To get the Blood Pepper without buying seeds off the Market Board, you would begin by gathering:
- Dzemael Tomato seeds from a timed level 50 node
- Midland Cabbage seeds from a level 30 node
- Pearl Sprout seeds from a timed level 55 node
- Old World Fig seeds from a timed level 50 node
- Prickly Pineapple seeds from a timed level 50 node
Now that you have your starter seeds, you would:
- Cross the Fig and the Pineapple to get Glazenut seeds and the Cabbage and the Pearl Sprouts to get Dalamud Popoto sets (5 days)
- Cross the Dalamud Popotoes with the Dzemael Tomatoes to get Chives (5-6 days)
- Cross the Chives and the Glazenuts to get Blood Peppers (5-7 days)
That’s an investment of over two weeks of real time to produce a Blood Pepper seed — IF all your crosses work out.
Once you have some Blood Pepper seeds in your possession, however, you can set up this three-garden plot loop below to keep them coming with much less effort:
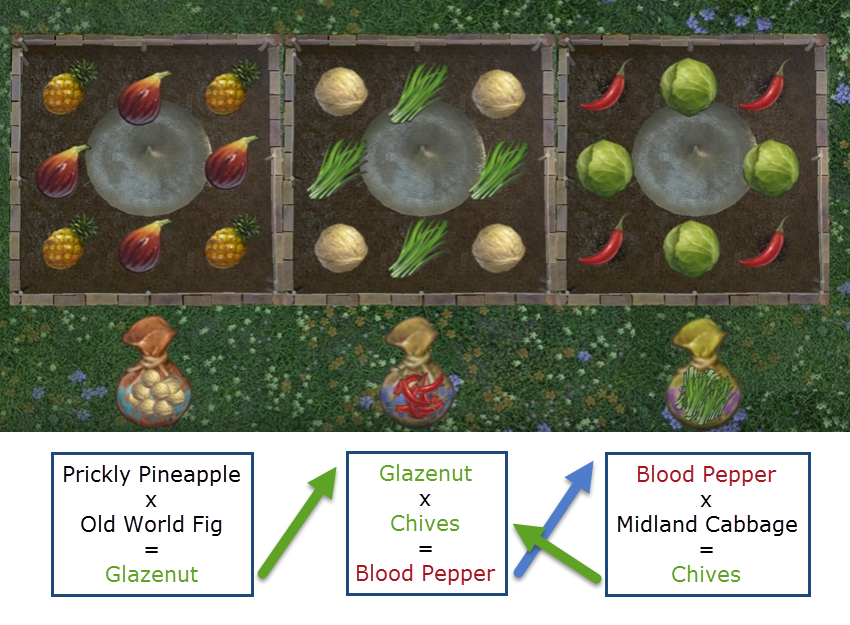
Pineapple, Fig, and Cabbage can all be gathered, and the Blood Pepper seeds can be used to create more Chives to use for the next cross.
Happy gardening!


It’s really nice to have concise and accurate information on this stuff. It’s pretty hard to find on the internet. Thanks for putting together such a complete (and entertaining) guide to gardening.
LikeLike
You’re welcome! I wanted everyone in the FC, especially the officers, to understand what was going on with the gardens. Since it’s a part of the game you can’t actually access without first getting housing, a lot of people just have no idea what goes on with gardening.
LikeLike